Table of Content
- Sign up: Create your first account on Mastodon
- Complete your profile and setting
- Access basic timelines
- Custom timelines
- Boost your first toot
- Interacting with people’s posts
- Search: How to find toots and find friends by hashtag and URL
- How to follow a profile
- Dealing with unwanted content
- Sending a direct message
1. Sign up/Sign in: Create your first account on Mastodon
- Step 1: Choose an instance to begin.
If it’s your first time you come to Mastodon with nothing in mind about which community you would like to involve in, follow the steps below to choose an instance:
- Access https://joinmastodon.org
- Click “Get started”
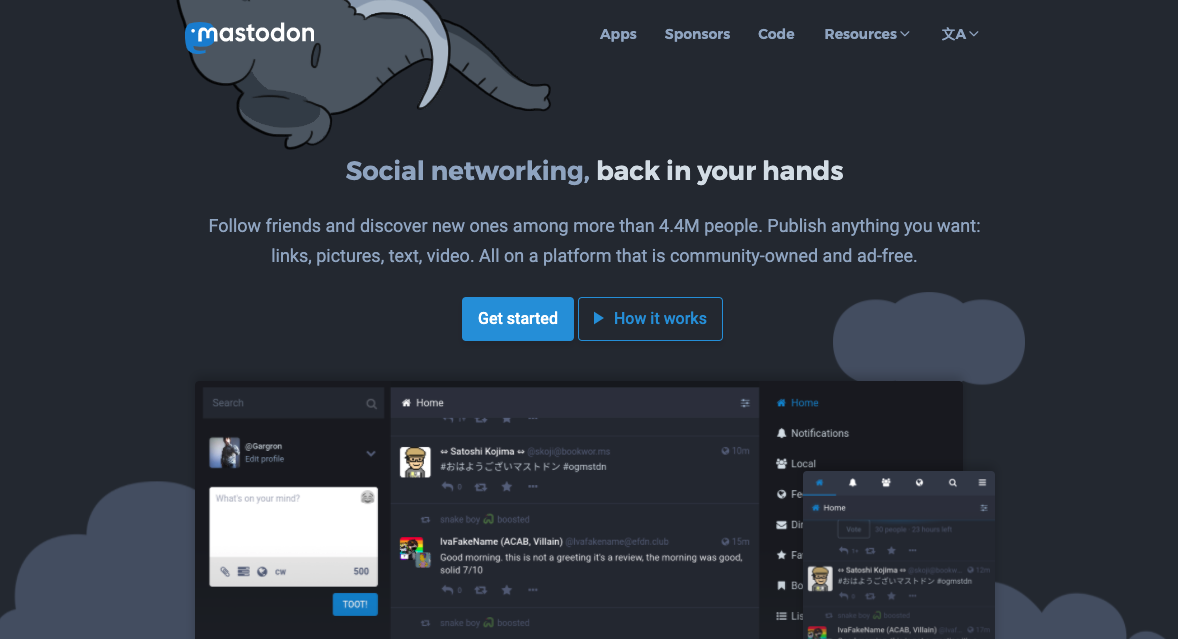 - Choose an instance: Now select a server from “category”. Your options will include General, Art, Technology, Food and so on. Just choose one thing that is related to your interest. Don’t worry, you can migrate to other instances later.
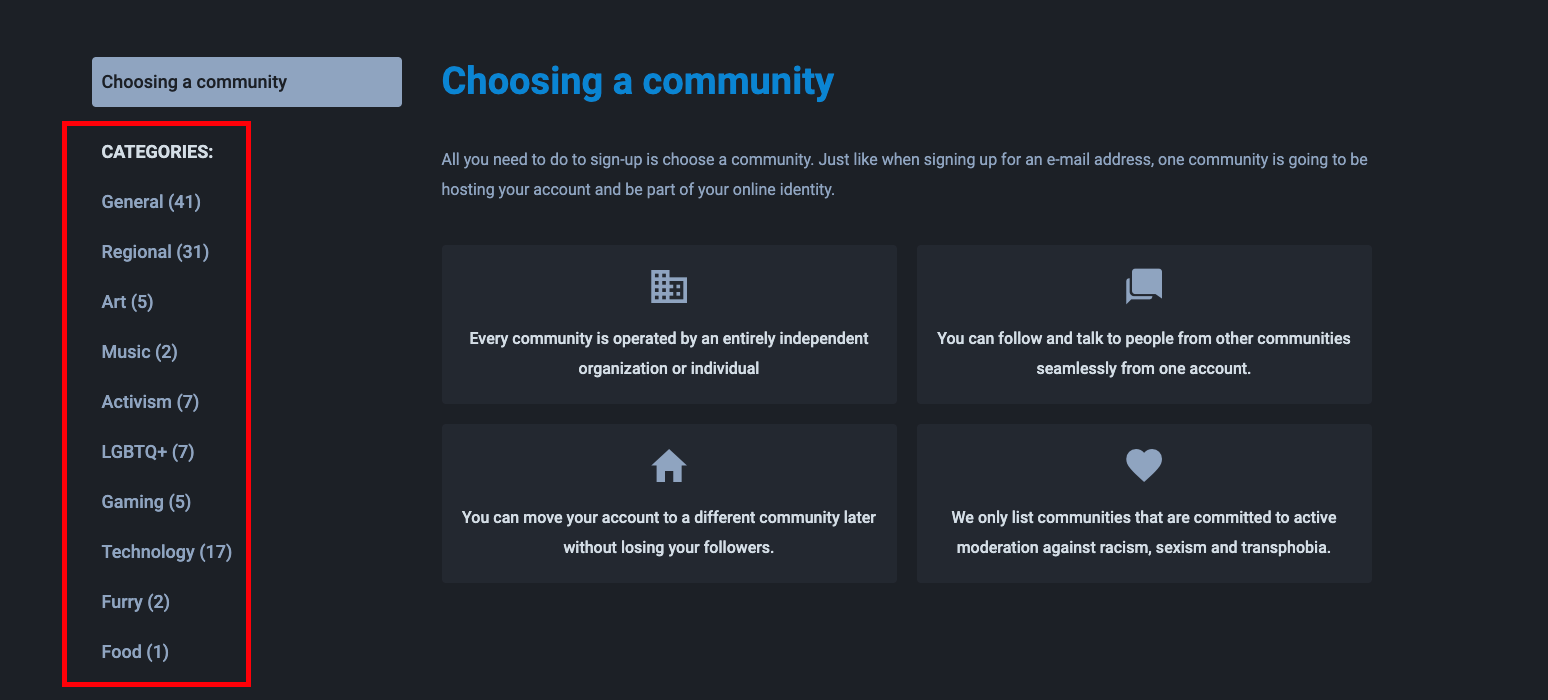
If you come to Mastodon knowing exactly which instance will you join, just access Mastodon via the website of that instance. For example, https://mastodon.social/ is the website of Mastodon.social instance.
- Step 2: Sign up/register:
- Fill in your username, email address, and password to create an account.
- Some instances will require you to enter the reason why you want to join that instance.
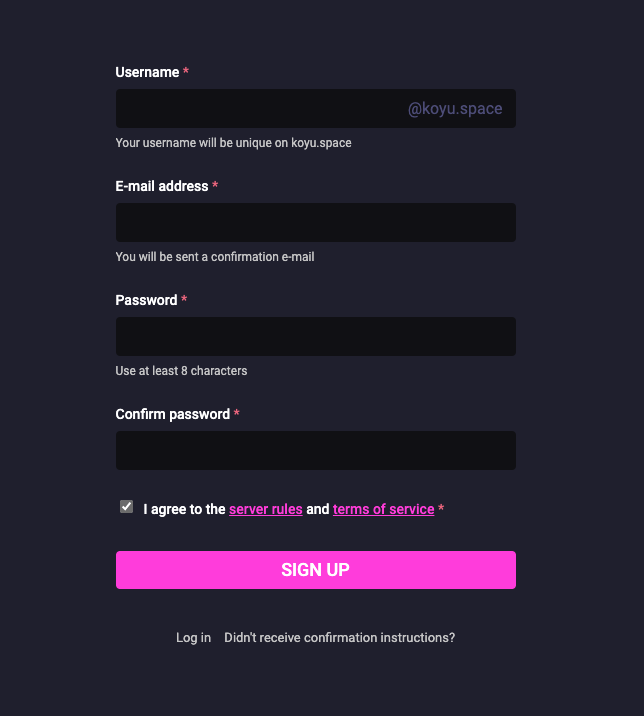
- Step 3: Activate your account
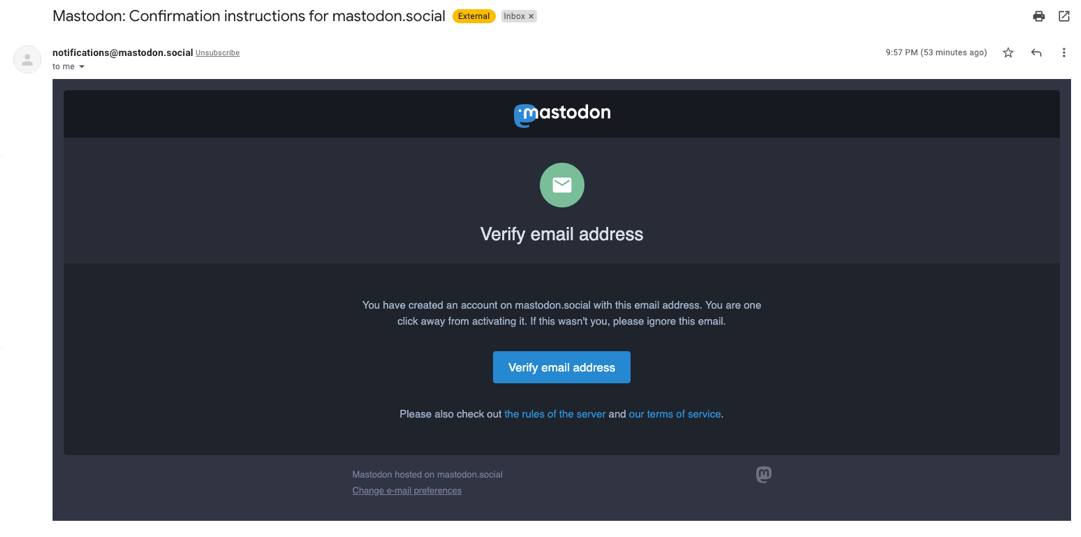
- After you fill in all the required fields and click “Sign up”, the system will send you a confirmation email.
- Open your email and click “Verify email address” to activate your account
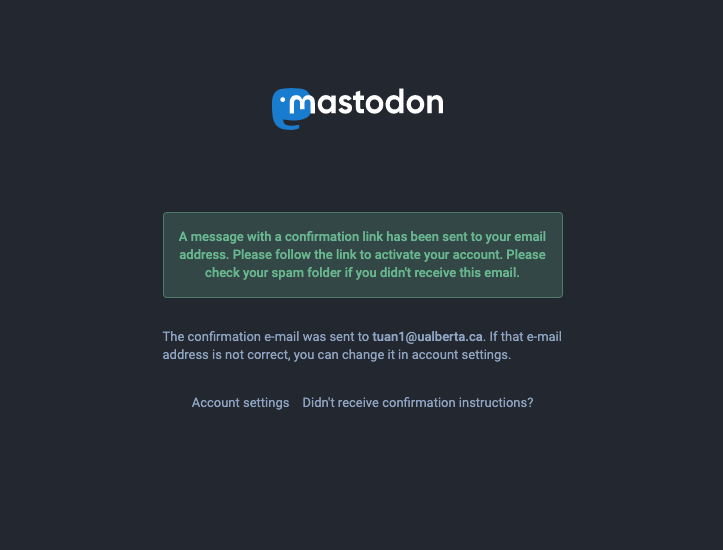
- Step 4: Welcome to your new home!
2. Complete your profile and basic setting
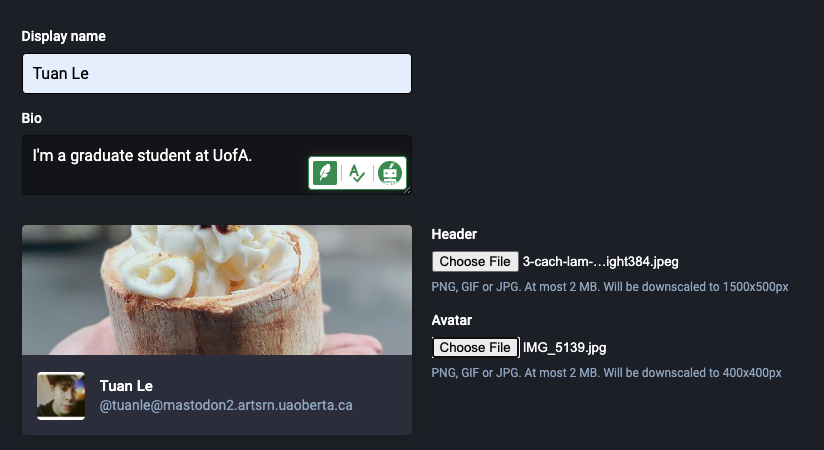
- Click on “Edit profile” right in the left corner of your screen
- Some basic information that you need to fill in includes:
- Display name (the name that you want other people to see)
- Bio (something you want to share about yourself or anything else)
- Header (it is the same with “Facebook cover”)
- Avatar
- Most of the setting options on this page will be familiar to anyone who has used social media before, but a few options stand out
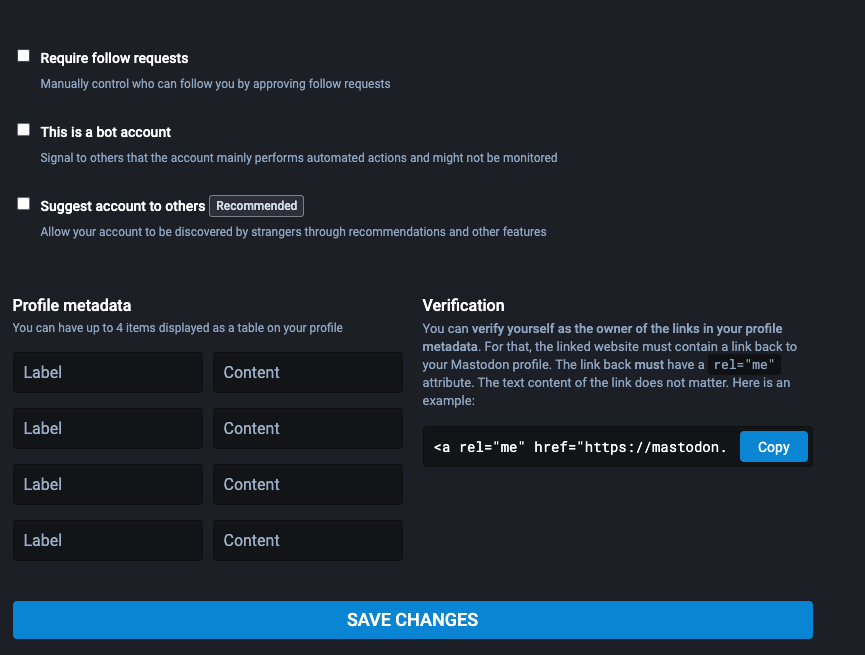
- The “Require to follow requests” option will give you a chance to review your follow requests from other users.
- The “Suggest account to others” option: allow your account to be discovered by strangers through recommendations and other features
- The Profile Metadata section lets you add links or personal stats to your bio page. If you want to display a preferred pronoun, a link to a personal website, or batting average, this is the place to do it.
- The Verification section works differently than verified accounts on Twitter or Facebook. On those platforms, the company verifies you if they deem you worthy. On Mastodon, adding a link to your personal homepage verifies your identity. The goal isn’t to get a fancy check-mark, it’s to provide a little more confidence that you are who you say you are. It’s also completely optional.
- After filling in everything, click “SAVE CHANGES“ to complete the process.
3. Access basic timelines:
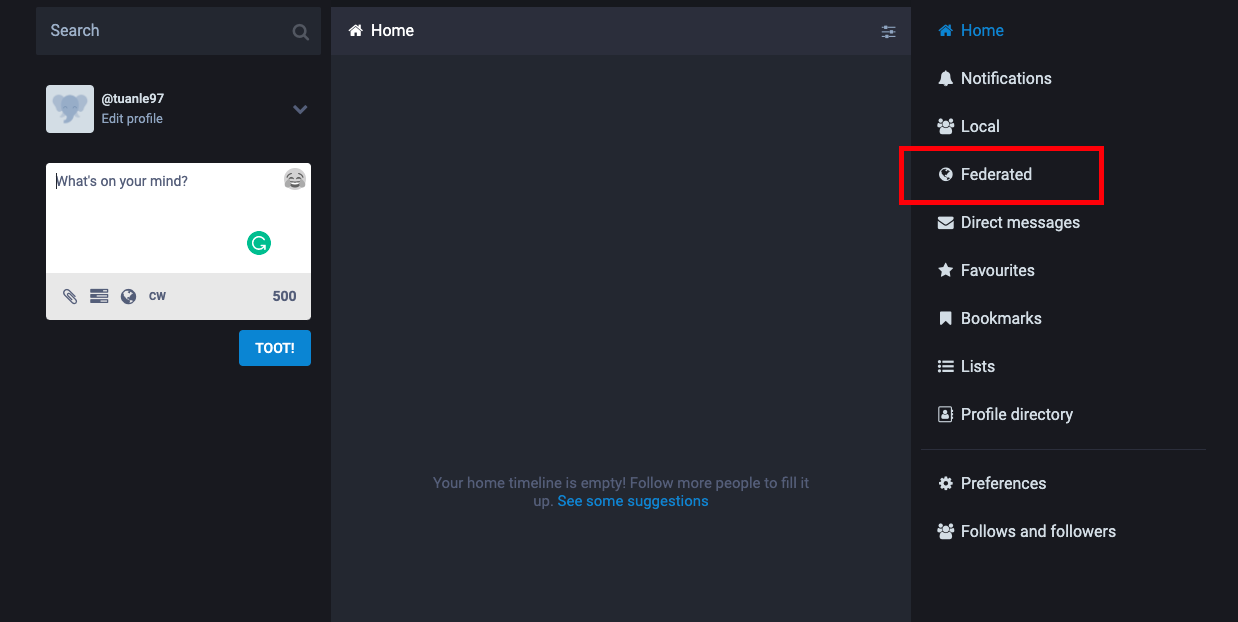
Once you’re in, you’ll be presented with three timelines: home, local and federated timelines. - Your default timeline is the home timeline - You can switch to the local timeline by clicking “local” on the right column of your screen. - Similarly, you can switch to the federated timeline by clicking “Federated” on the right column of your screen.
4. Custom timelines
-
Besides the 3 default timelines mentioned above, there are 2 other custom timelines that you can set up for your own purposes including the List timeline and hashtag timeline.
-
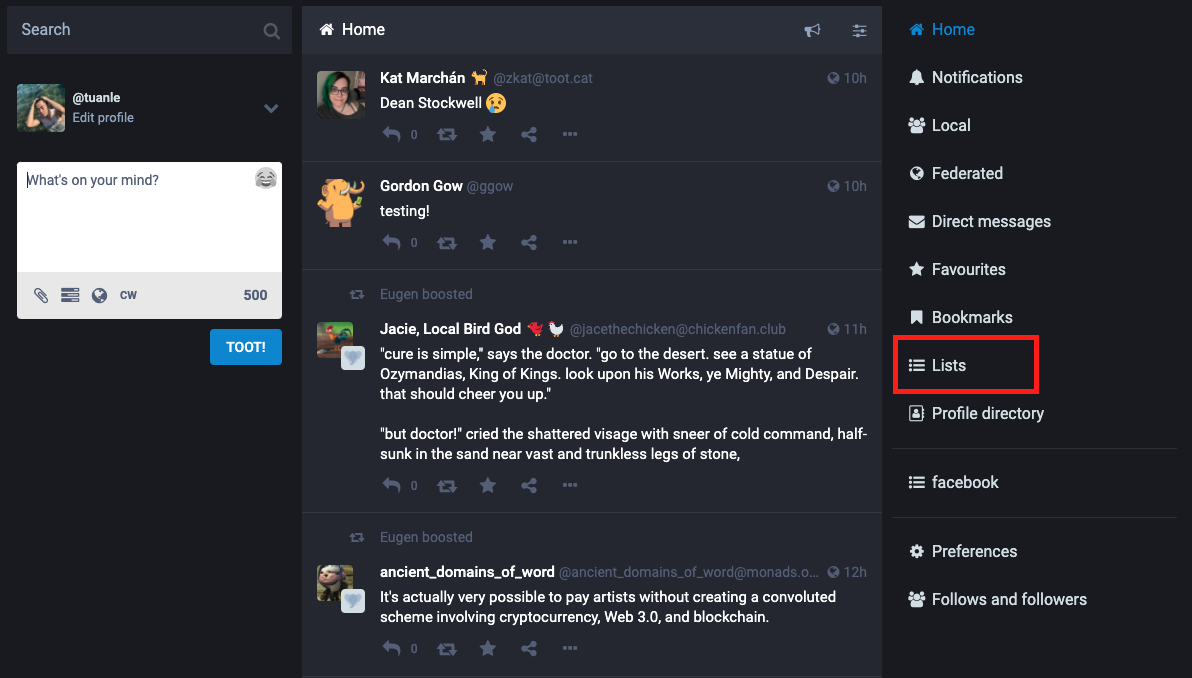
List timeline: List timelines help you watch over certain people separately. For example, you may create three lists of “My Family”, “Football Friends”, “Cooking Friends”, which contain your family, your football friends, and your cooking friends. This timeline will contain public toots from the people you added to that list. On Mastodon, Lists can only contain people you follow. To create a list:
- Step 1: Click “Lists” on the right column of the screen.
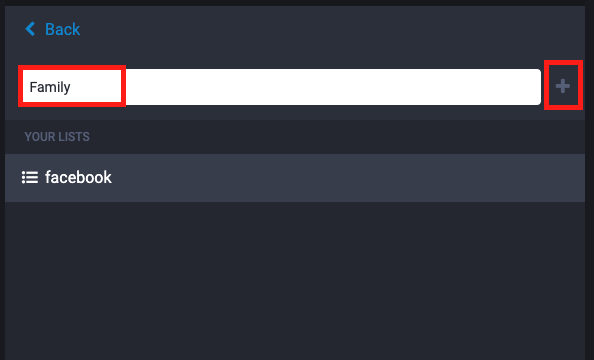
- Step 2: Enter the name of the list and click the (+) icon.
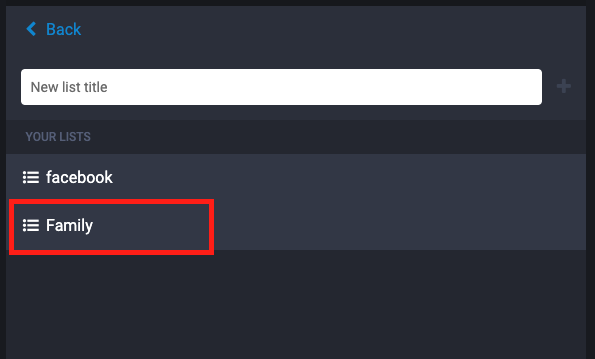
- Step 3: The list that you’ve just created will appear right below. Click on that list to add members
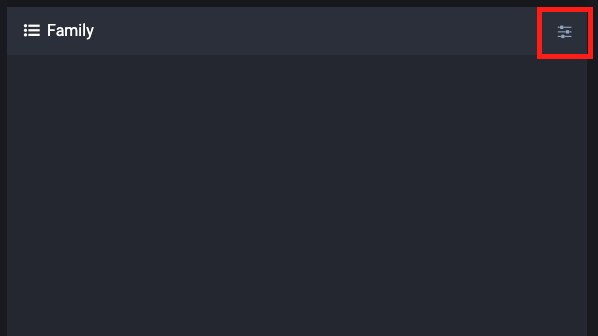
- Step 4: Click the “adjustment“ icon right next to the name of the list
- Step 5: Click “Edit list“
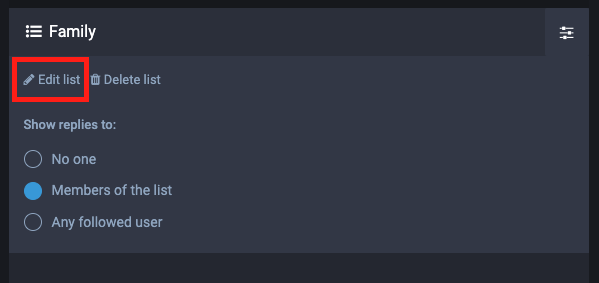
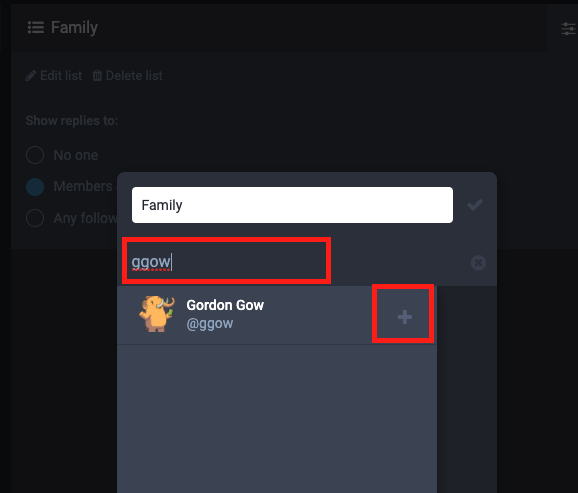
- Step 6: Enter the username of the person you want to add in the “search among people you follow” box and click the (+) icon to add them.
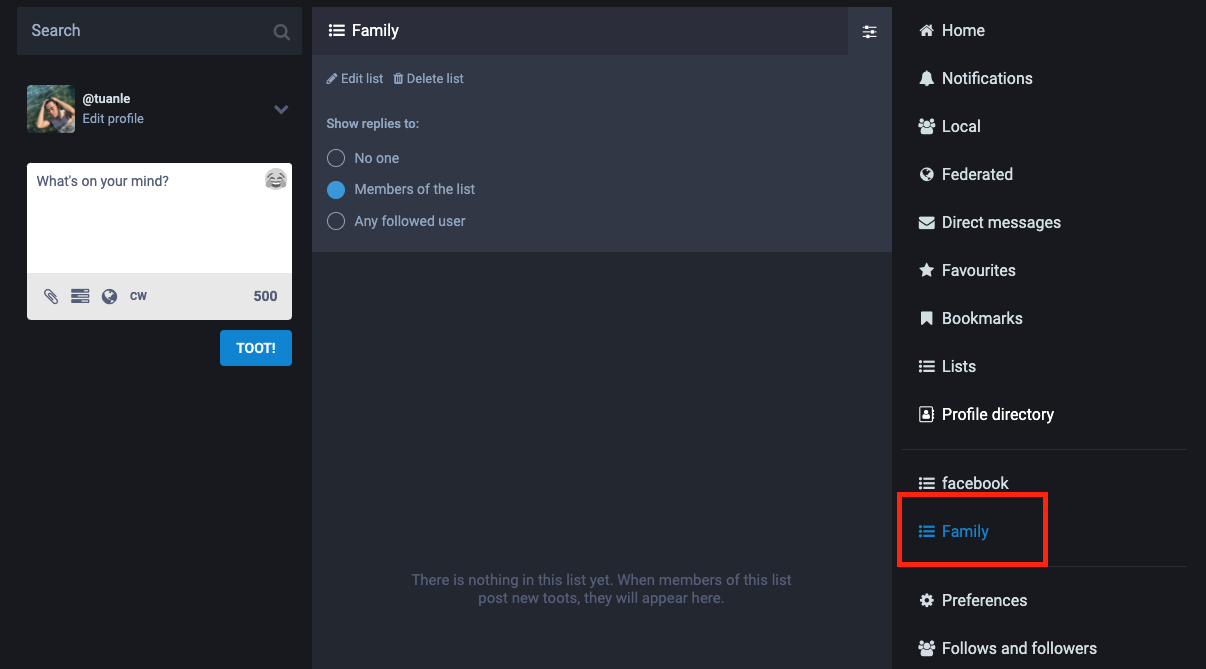
- Step 7: A new list timeline is now appearing in the right column of your screen. You can add as many list timelines as you want.
- Step 1: Click “Lists” on the right column of the screen.
-
Hashtag timeline: A hashtag timeline helps you to view public statuses containing the given hashtag. By doing this, you can set up a separate timeline of specific hashtags across the federation. Remember that Mastodon allows you to make a timeline from a combination of hashtags. One more thing to note is that to set up a Hashtag timeline, you will need to switch the default interface to an advanced interface, which will be explained below. To create a hashtag timeline:
-
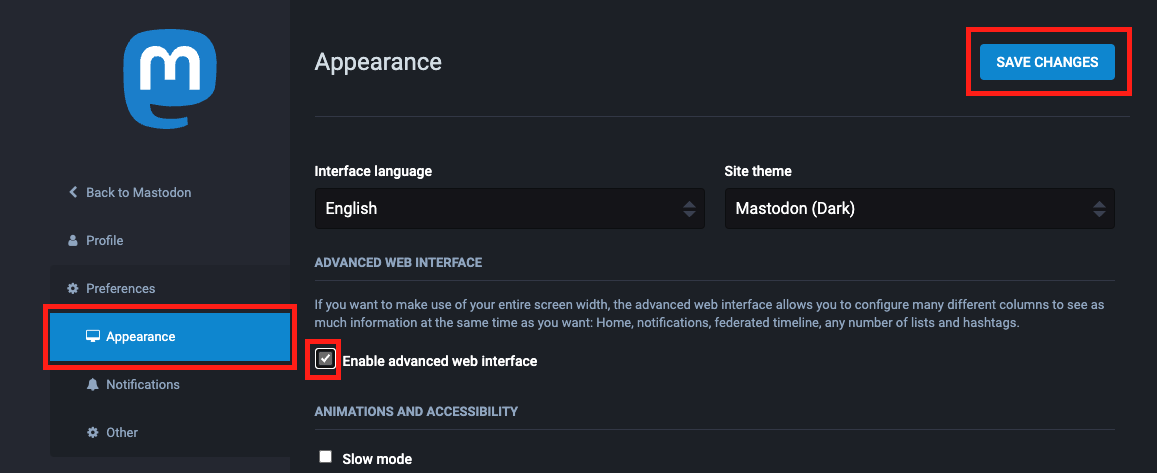
Step 1: First, switch into an advanced interface. Begin with clicking “Preference“.
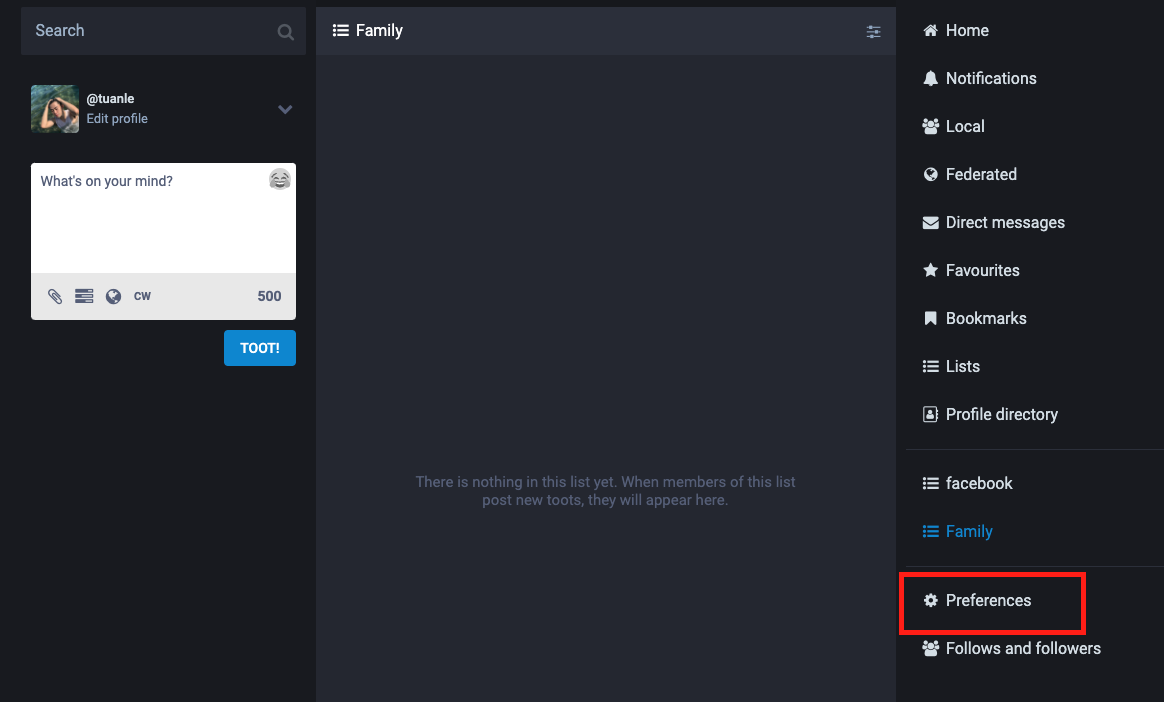
At the “Appearance” tab on the left column of the screen, tick the box “Enable advanced web interface“. Then click the “SAVE CHANGES“ button at the top of the page.
By the time you get back to the home page, the whole interface would have been changed into a new one as below. Instead of 3 columns as a normal interface, the advanced interface will divide your screen into many columns depending on your setup.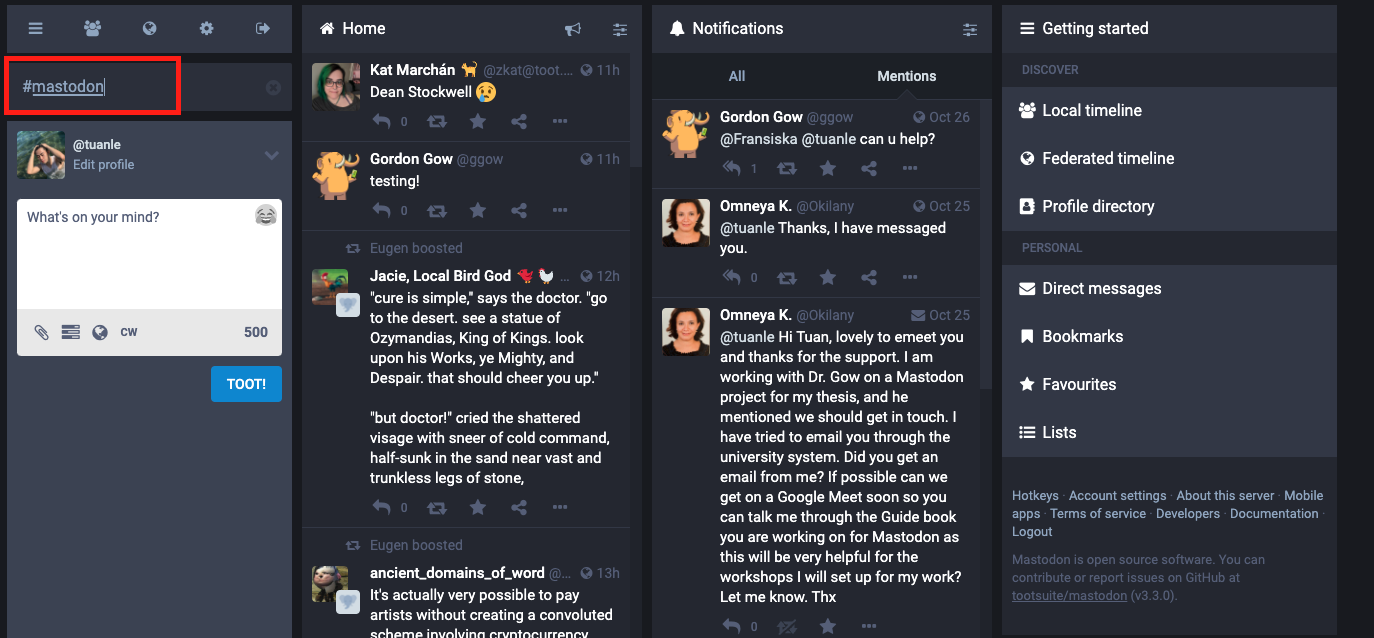
-
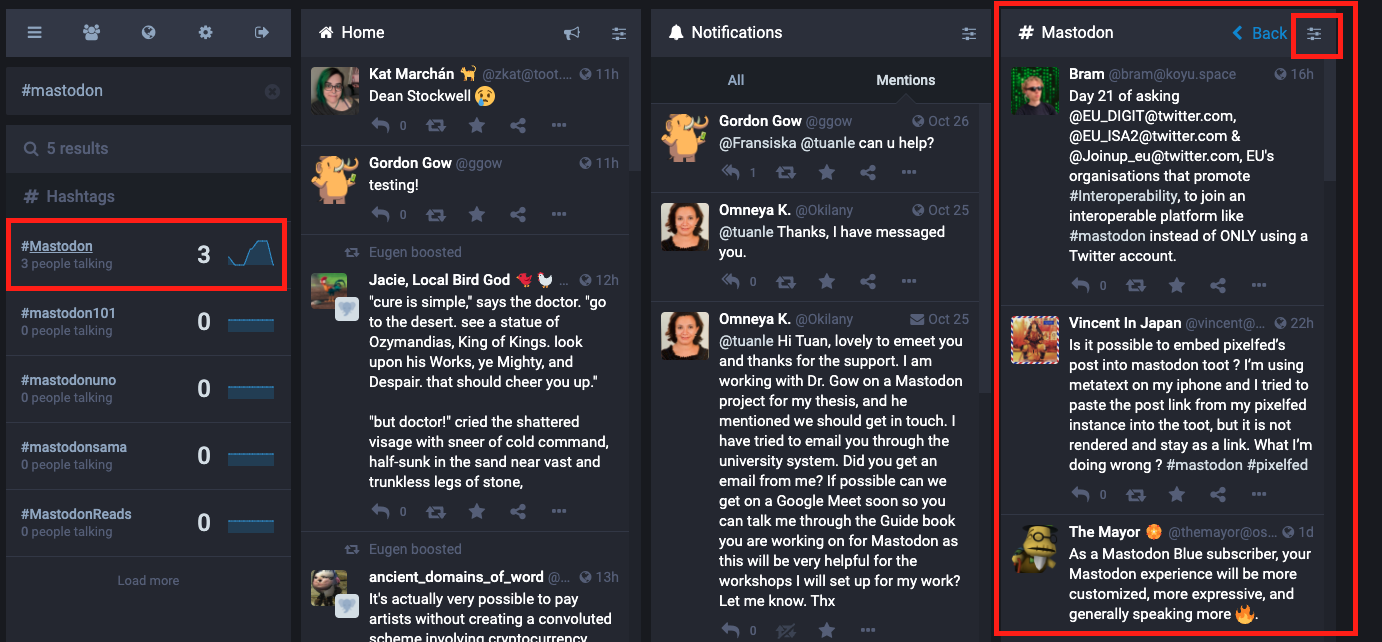
Step 2: Next, to set up a Hashtag timeline, search your hashtag by typing “#(hashtag)” in the search box. Then, in the list of hashtags shown up under the search box, choose the one you want to explore. A new timeline containing all the toots that have that hashtag across the federation will immediately appear on the screen.
-
Step 3: Then, you can pin this timeline by clicking the “adjustment“ icon in the left corner of that timeline. Continue to click (+Pin) to finish the process. This timeline will now always appear when you log in to Mastodon.
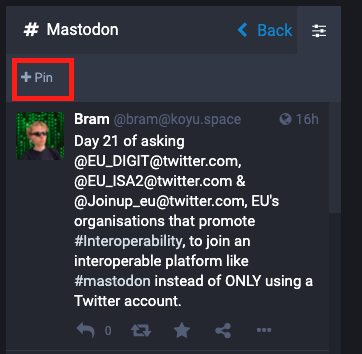
When you click the “adjustment“ icon again, you can “unpin“ to delete the timeline, “Include additional tags for this column“ to set up a timeline that contains toots with more than one hashtag and restrict the timeline that only contains toots from your instance by turning on “Local only“ mode.
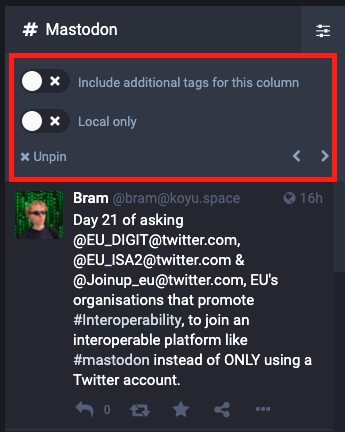
-
Step 4: To add more hashtags to this timeline, turn on “Include additional tags for this column”. There are 3 options for you. “Any of these“ means the timeline will contain toots that have at least one of the hashtags that you type in the box. “All the these“ means that the timeline will contain only toots that have all of the hashtags you enter. “None of these“ means that the timeline will exclude all the posts that have hashtag that you type in the box.
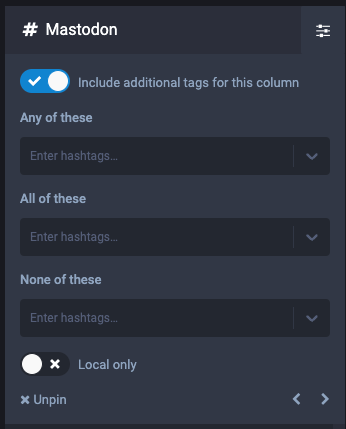
-
5. Boost your first toot
- Step 1: Start by typing what’s on your mind in the text box on the far left column. Below are some things to keep in mind when you write a toot:
- Length: You have 500 characters to play with, or more depending on the instance you join, so write as much or as little as you want.
- Image and video: You can add an image and video by clicking the “Attached” icon, pasting an image from your clipboard, or clicking and dragging a photo over the page.
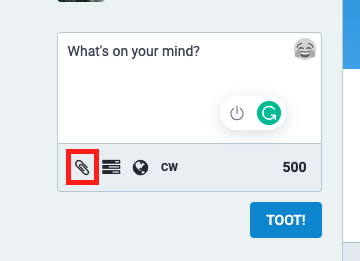 When an image is added, you can add a description for the visually impaired. If your image is NSFW, has some content that people might not want to see, or is better revealed as part of a gag, click “Mark media as sensitive”. This will veil the image in people’s feeds; they simply have to click to reveal it.
 - Poll: You can add a Poll by clicking the bar graph icon.
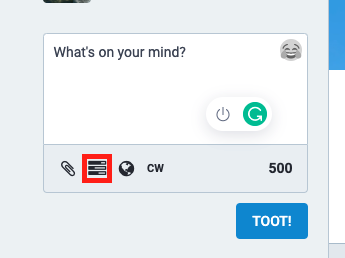
- You can add up to 4 choices.
- Each choice can be up to 25 characters.
- Polls default to one-of / single-choice. Click on the circle box right next to the choice to switch your poll to any-of / multiple-choice checkboxes.
- Polls can be set to expire in 5 minutes, 30 minutes, 1 hour, 6 hours, 1 day, 3 days, or 7 days.
- Privacy: the globe icon lets you choose how visible your Toot is.
- The default option is “Public”, meaning it will appear in all timelines. (You can change the default visibility in Settings.)
- “Unlisted” means your Toot will only appear in the timelines of other users, not in public feeds like the one on the Mastodon.social/about page.
- “Followers-only” hides your Toot from anyone other than your followers.
- The last option, “Direct”, is similar to a DM on Twitter. The Toot will only be seen by the people you mention by their usernames in the post.
- Policy of content: As a decentralized platform, Mastodon doesn’t have a policy list for content like Facebook. However, each instance will have different rules about this which may require you to carefully read the introduction of the instance to find out.
- Adding warning labels to toots: Similarly, the CW icon lets you create a Content Warning. This opens a new text field above the main field, where you can write a warning about what you’re going to share. People can choose whether or not to read it.
- Step 2: Click the Toot button to boost your toot.
6. Interact with people’s posts
- You can perform quick actions on a post directly from the timeline, or you can click on the post to load an expanded view that shows extra information, such as a full timestamp, interaction counts, and threaded replies if any.
- The following actions can be performed on a post:
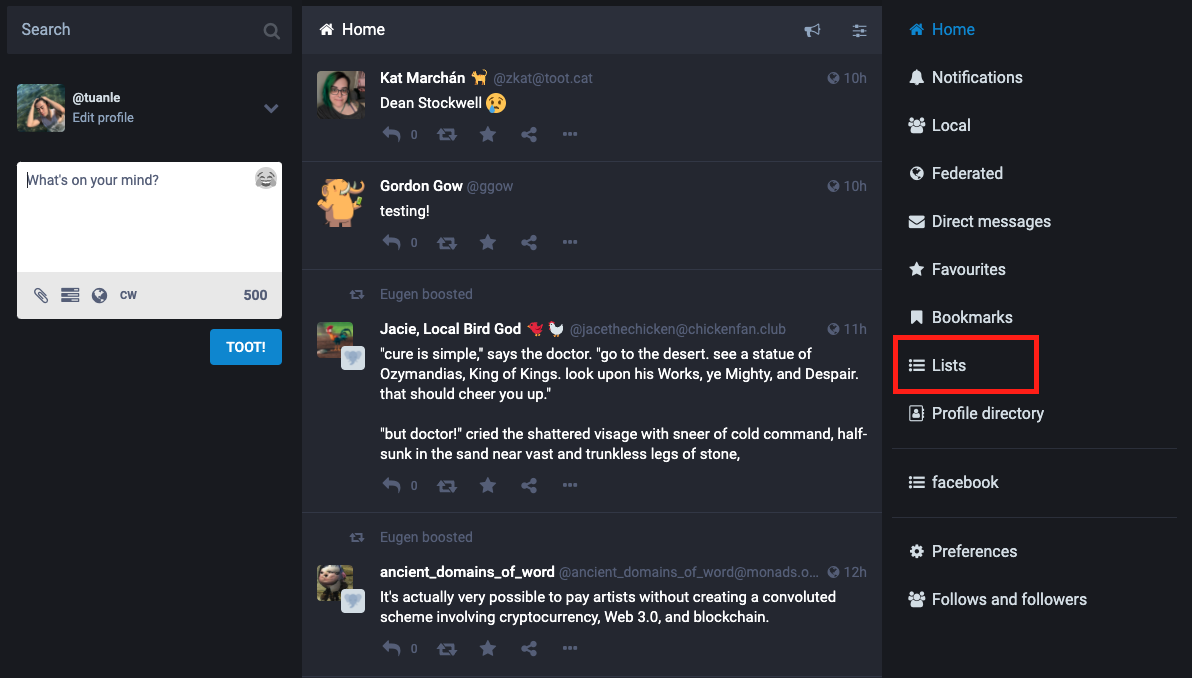
- Reply to a post by clicking the arrow icon. Your toot will show up in the thread below the post you are replying to.
- Boost a post by clicking the cycled-arrow icon. The post will be reshared on your profile.
- Favourite a post by clicking the star icon. The post will be added to your favourites list, and a favourite notification will be delivered to its author.
- Bookmark a post by clicking the ribbon icon. The post will be privately added to your bookmarks list without generating a notification.
- Access a menu of additional options by clicking the 3 dots icon.
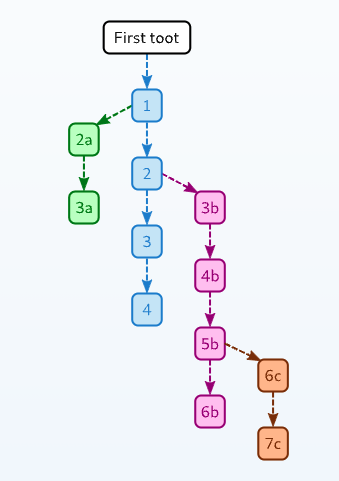
- In Mastodon, when you reply to a toot, the replies will show up in a thread and ramification form. A thread can evolve into a sort of “tree-like” form as people reply and counter-reply to different posts. The picture below shows how a thread can evolve from a single post into four different branches:
7. Search: How to find toots and find friends by hashtag and URL
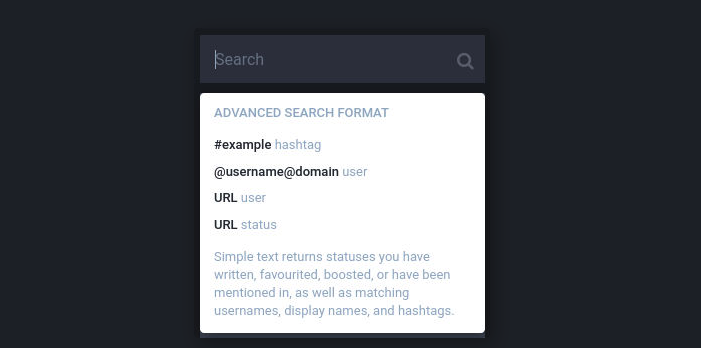
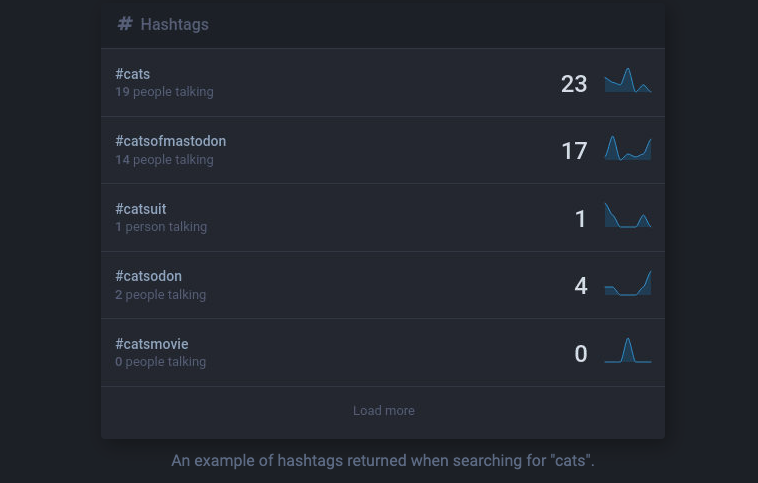
- Mastodon’s basic search allows logged-in users to find toots containing a specific hashtag, or to load a user or status directly if they know the URL or address. Searching for a term will show profiles whose username or display name contains that term, as well as hashtags that match or contain that term.
- The search box does not explore the entire Fediverse (the network of the instances) but only the portion of it that your instance is connected to. Therefore if you search for a user it will search among all the users of your instance and of the instances you are connected to, but not those who are on instances you aren’t connected to. If you search a hashtag it will not list all the posts from all the existing instances containing it but only the posts published by users that your instance knows.
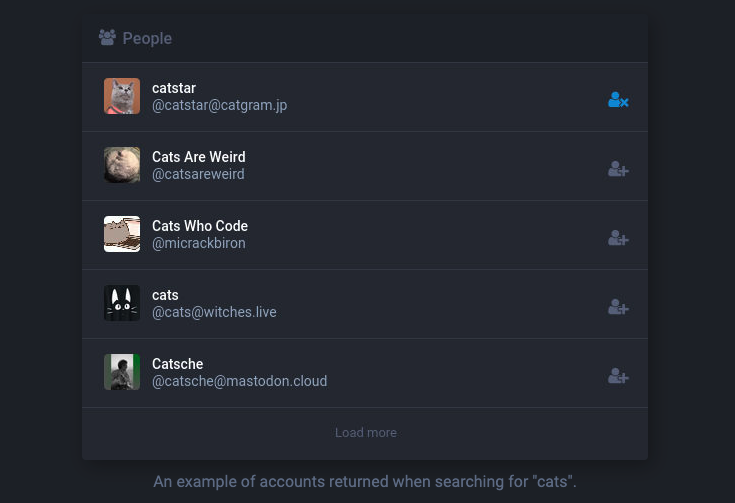
8. How to follow a profile
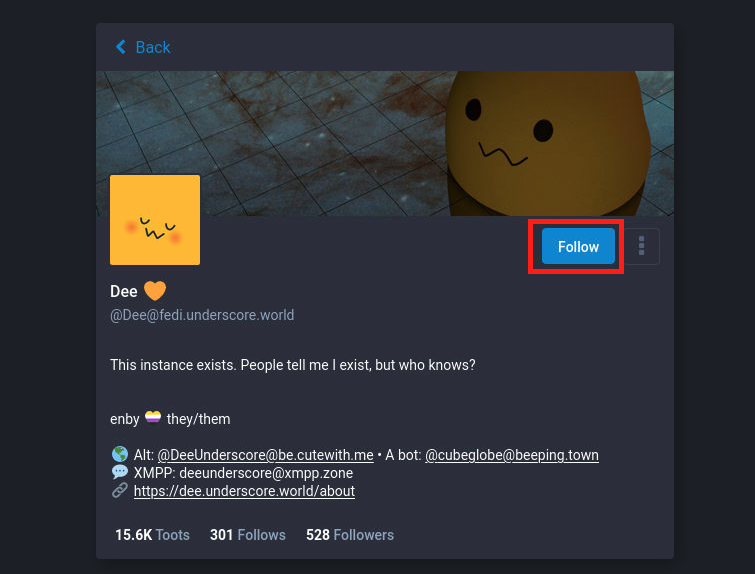
- Step 1: Click on the user’s name to go to their profile
- Step 2: Click the “Follow” button
9. Dealing with unwanted content
As a user, you can deal with unwanted content using any of the 3 options described below:
-
Filtering post: It is possible to filter statuses for specific keywords and phrases so that they can be hidden automatically.
- Step 1: To create or manage your filters, go to Preferences > Filters. The “Add new filter” button will let you create a new filter, and existing filters can be edited or deleted. Your existing filters will be summarized in a table.
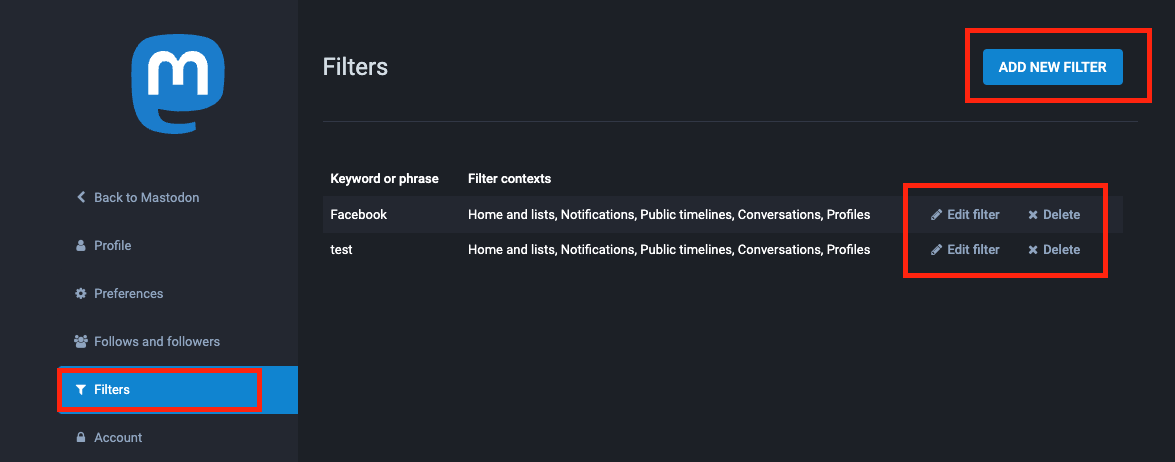
- Step 2: Click the “ADD NEW FILTER“ button, and a table will show up for you to create a new filter.
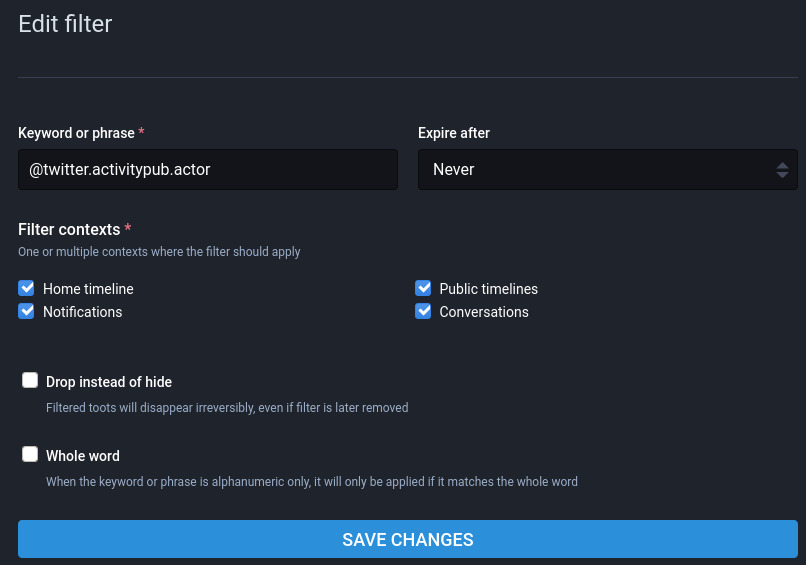
- Keyword or phrase: This is the string that will be matched. The keyword will be searched for in any status content, including CW, media descriptions, and poll options.
- Expire after: Optionally only apply the filter for a limited amount of time. Expired filters are not automatically deleted, but can be reactivated by setting a new expiry date (or changing it back to “never” expire).
- Filter contexts: Choose where the filter will be applied:
- Home timeline and lists = matching statuses will be removed from your home feed and lists
- Notifications = matching notifications will not be shown
- Public timelines = matching statuses will not appear in local/federated timelines
- Conversations = matching statuses will be hidden in threads and detailed views
- Drop instead of hide: Filtering is usually done client-side so that disabling a filter will cause filtered statuses to be visible again. However, if you enable “drop instead of hide”, any matching statuses will disappear completely and will never be delivered to your home or notifications.
- Whole word: Filters normally apply to any status that contains the included characters, regardless of whether they are in the middle of a word. Enabling “whole word” will only apply the filter if the keyword is surrounded by spaces or other non-alphanumeric characters.
- Step 1: To create or manage your filters, go to Preferences > Filters. The “Add new filter” button will let you create a new filter, and existing filters can be edited or deleted. Your existing filters will be summarized in a table.
-
User-level actions
- Each user has the ability to mute, report, or block users or the whole instance that that user belongs to. Don’t hesitate to do this if you find something or someone that bothers you. You can do it right at the toot, or go to that user’s profile.
- Step 1: Click the “3 dots icon” under the toot
- Step 2: Choose the actions you want to do
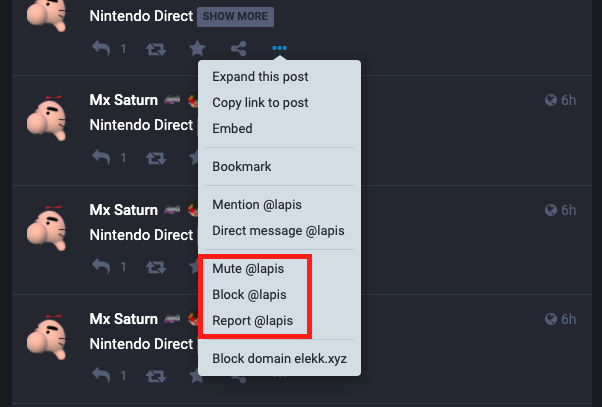
-
Muting: When muting, you have the option to mute notifications from them or not. Muting without muting notifications hides the user from your view. Therefore,:
- You won’t see the user in your home feed
- You won’t see other people boosting the user
- You won’t see other people mentioning the user
- You won’t see the user in public timelines
If you choose to also mute notifications from them, you will additionally not see notifications from that user. Mutes can also have an optional duration, after which they will expire. The user has no way of knowing they have been muted.
-
Blocking: Blocking hides a user from your view. Therefore:
- You won’t see the user in your home feed
- You won’t see other people boosting the user
- You won’t see other people mentioning the user
- You won’t see the user in public timelines
- You won’t see notifications from that user
-
Additionally, on the blocked user’s side:
- The user is forced to unfollow you
- The user cannot follow you
- The user won’t see other people’s boosts of you
- The user won’t see you in public timelines
- If you and the blocked user are on the same server, the blocked user will not be able to view your posts on your profile while logged in.
-
Blocking an entire domain (instance): If you block an entire server:
- You will not see posts from that instance on the public timelines
- You won’t see other people’s boosts of that server in your home feed
- You won’t see notifications from that instance
- You will lose any followers that you might have had in that instance
You can also do this in their profile. The progress is the same.
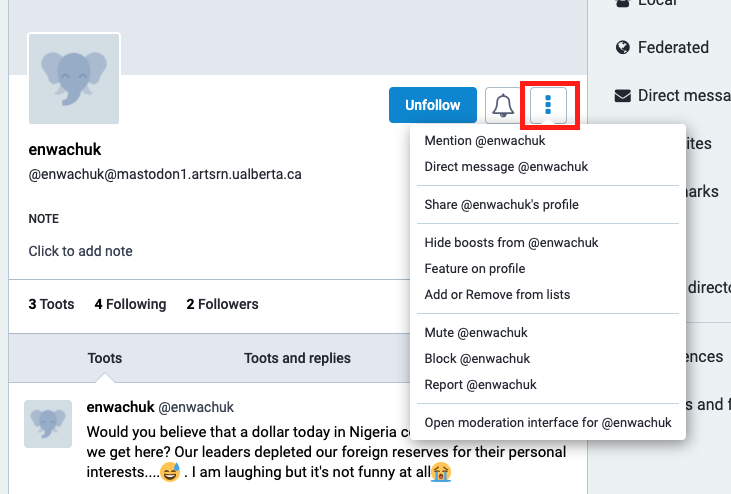
-
Hiding boosts: If you hide boosts from someone, you won’t see their boosts in your home feed. This option only appears on users who you are currently following.
-
-
Reporting problematic content to moderators
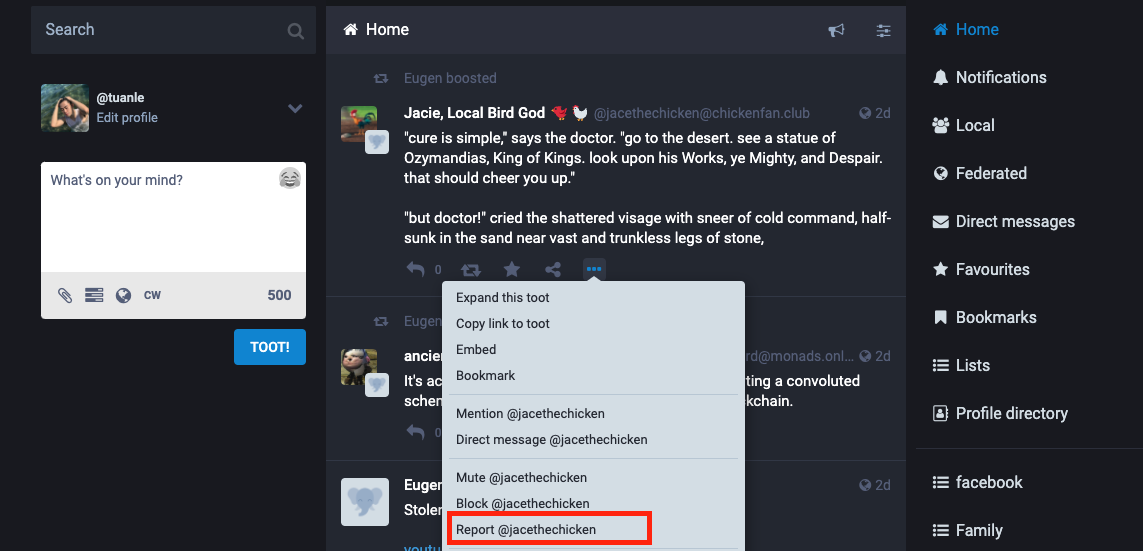 If you see a status or user that is violating the rules of your website, you can report that user to your site’s moderators. Clicking the “report” option on the user dropdown or status dropdown will open the report modal. Here, you can (and should) add a note about why you are reporting this account. You can attach certain problematic statuses for additional context on why you are reporting the account, and if their conduct is violating the rules of the remote website, you can also choose to forward the report to their site’s moderators.
10. Sending a direct message
- Direct messages in Mastodon are toots that are only visible to you and the one you send messages to.
- There are 2 ways to send a DM. One way is to send a toot but remember to change the privacy of the toot to “Direct“ and tag the one that you want to send a DM to.
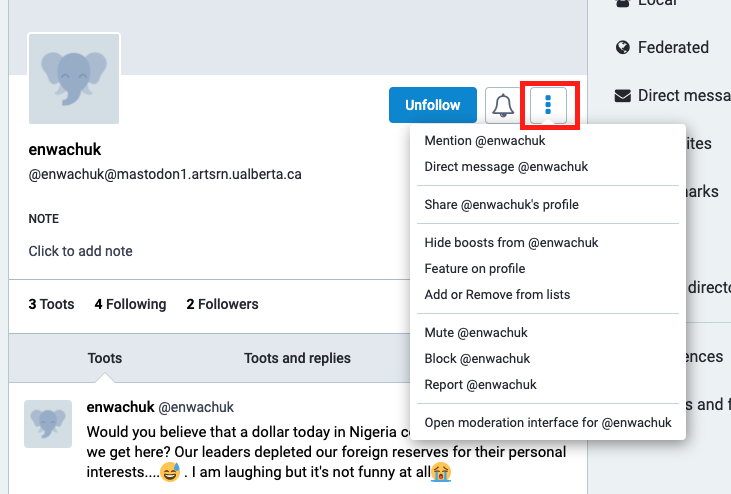
- Second, you can send a direct message to other people via their toots or profile.
- Step 1: Clicking the “3 dots icon”
- Step 2: click “Direct message @…”
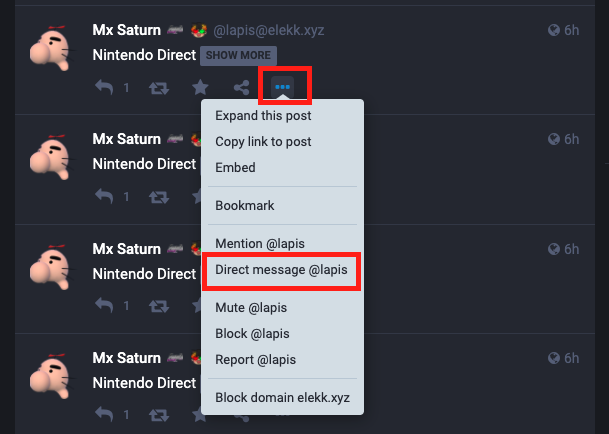
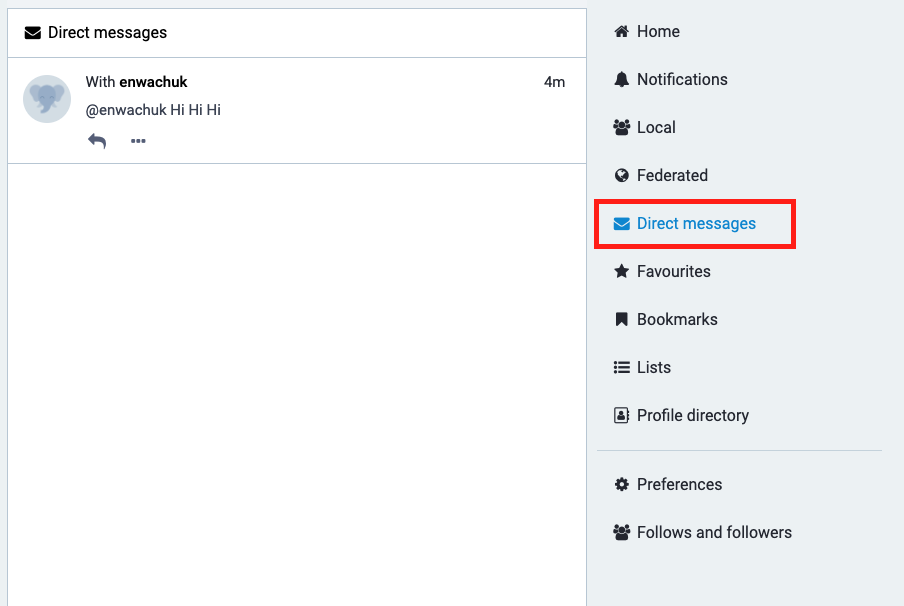
- Click “Direct messages“ in the right column to access the direct messages list:


Comments
September 20, 2022 17:03
@tuan1 Amazing
September 20, 2022 17:06
@tuanle@mastodon1.artsrn.ualberta.ca Thank you